
Weekend Epoxy Job
Epoxy Weekend
One rookie installer experiences installing epoxy and decorative dining room floor.
OVERVIEW & PURPOSE
To make my wife happy. Come on….lets be honest, Happy Wife Happy Life!! Can anyone argue with that fact?
Actually, my wife and I have been slowly trying to make some improvements to our home and the dining room was next on the list. At the present time, we had carpeting in this room and want to get rid of the carpet and go to a hardwood . As Scorpion immersed itself in the Epoxy market, I started changing my thoughts to using the ScorpionPro Epoxy and a better option.
EXPECTATIONS
- A finish that is easy to clean.
- Durability.
- Unique Look.
- Professional Look.
As we considered this project, we wanted to have a surface that will be easy to clean and maintain. We have 2 daughters that are not always tidy. Ability to clean up messes was very high on our list.
Durability was important to us as well. With two active kids and neighbors that visit frequently, our dining room sees more than its share of traffic.
We wanted to have something that was our own. Not a look you can go to the local store and reproduce.
We agreed that if we felt we couldn’t make the finish look professional, that we would hire someone to do it. I was confident…..my wife doubted me, but gave me the benefit of the doubt and we tackled the project together.
MATERIALS NEEDED
- Epoxy
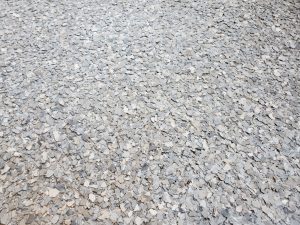
- Decorative Flake (we used dolerite)
- Polyaspartic Top Coat
- Roller
- Mix Container

- Paint Brushes
- Paint Rollers
- Painters Tape
- Hand Held Squeegee
- Spike Shoes
- Variable Speed Grinder
- Diamond Tip Attachment (concrete prep)
- Drill
- Mix Paddle
- Plastic
- Shop Vac
- Broom
- Dust pan
- Floor Scraper
- Putty Knife.
- 6 Pack of Beer
- 1 Bottle of Wine
NOTE:
#2 there are an endless amount of color themes you can go with. Scorpion offers 9 standard flake options, but you are not limited to those. Click here to see our lineup of decorative flake
#8 during the epoxy and polyaspartic application, you will need to walk on the epoxy. Therefore, you will need to have a set of spike shoes that strap to your shoes. These are inexpensive and we have seen some installers used metal baseball spikes if you do not have access to strap on spikes.
#13 for our project, we have 2 separate entries to our dining room. We covered each entry with plastic to minimize dust during the grinding process. You can rent a grinder from your local hardware store that has a vacuum system. If your budget allows, this is a great idea. If not, take the precautions and contain the dust.
THE PROCESS
Approach this project with patience. ( my own personal advice)
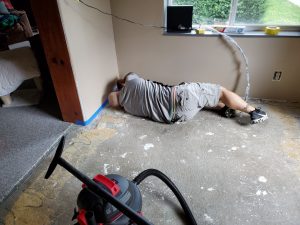
We removed the carpet and padding. Once we exposed the concrete I saw that I would need to remove the tack strips from the carpet. Removing the tack strips created a new problem, I now had some grooves and imperfections in the concrete that would need attention. This was a simple fix. I was able to fill these with crack filler before sanding.
Next we placed plastic sheeting over the entry ways. This is important because of a considerable amount of dust. We then began grinding with the diamond wheel attached to a variable speed grinder. This process prepares the surface for a coating, removing high spots, adhesive, and other debris. This is a dirty process and recommend PPE; safety glass, respirator, and ear plugs. 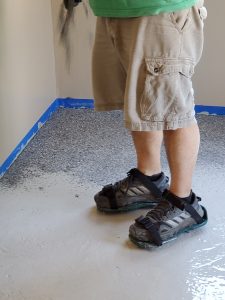
Now you get to clean up all that dust! Shop vac and broom!
Once your surface is cleaned, now is the time to apply your tape lines to protect the paint on the walls.
It is getting fun now! Mixing the epoxy and getting your base layer down. Once the base is down, you get to start spreading the flake. This is the point in the process where it starts to seem real. You get an appreciation for what the end product will look like. Cover all areas liberally with flake and then apply some more.
Relax and have beer, you have earned it! Depending on the set time of you base epoxy, the next step will happen once your epoxy has dried. For my application, I needed to wait 12 hours. The wait was exciting because you see the chips setting into the base. Again, getting a feel for how the finished product will look.
Scraping…..it is noisy. I used ear plugs and safety glasses. The dust was very minimal during this stage. You need to scrape the chips because some will dry in the base epoxy and an angle and you do not want this. I scraped in all 4 directions to ensure a clean and smooth surface. Shop vac and sweep. Shop vac and sweep. Shop vac and sweep. You want to ensure you have all the loose flake chips up.
The Magic Happens
Now is the time for the polyaspratic top coat.
Following the mix instructions, I prepared my top coat and started by paint brushing the edges and around HVAC vents. I then dumped the entire batch around the floor and used the squeegee to spread around. Once covered, I used the roller to ensure complete coverage and back rolled myself out of the room. 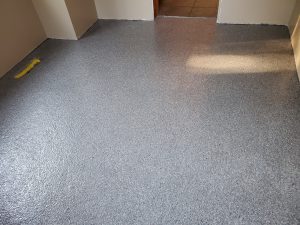
WRAP UP
My wife didn’t kill me, hell, we didn’t even argue. We worked together and even involved our kids in a couple of the steps. It was a family project that we tackled and are stronger for it. Our dining room floor will always be something we did together and have the memories of the project. Now we get to move on the next steps. New baseboard, light, HVAC Vents, and blinds. Lots to do for a small room, but it is an important room.
For specific application questions, you should reach out to the technical team at Scorpion Pro Epoxy HQ. This will help ensure you have a game plan that will ensure your desired outcome will be achieved and hopefully you wife not killing you.
You can learn more about the Scorpion Pro Epoxy material by clicking here, or calling us at (800) 483-9087