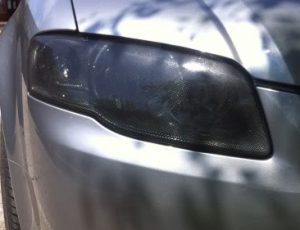
Head Light Film Kits From Scorpion


Note: Ideal application temperature is between 59-77°F. Environment is equally as important and we strongly recommend applying Scorpion Headlight Film in indoor environments. This ensures that the temperature stays consistent and minimizes risk of failure and contaminates. If applying outdoors avoid direct sunlight. Direct sunlight will make the film soft and harder to cut.
Recommended Tools:
- Knife and Felt Squeegee (Included)
- Cleaning solution (soap and water)
- Heat Gun
Preparing the Headlight Lens:
- Carefully clean the headlight lens using a soapy liquid and make sure all contaminants are removed from the lens. This step may need to be repeated in order to get all debris and contaminates off the lens. Once clean, let the lens dry completely.
- Tape off around the Headlight. By doing this, you are preventing the adhesion from the film from sticking to the body of the car which can cause tension where it is not wanted. This step is optional.
- Do a final clean of the lens and make sure that the gaps of the headlight are clean.
Applying Scorpion Headlight Film:
Note: Scorpion headlight film must be applied via a wet application method. Make sure to handle the film with care so it does not crinkle.
- Align the headlight film at the center of the headlight to ensure the film covers the entire headlight and look at the construction of the headlight to identify areas where you will want to stretch and shrink the film across the headlight.
- Put the headlight film facedown and wet the back of it to help easily remove the liner and then wet the headlight. Remove the film from the liner and apply the tint to the headlight, positioning it as needed.
- Next, use the felt squeegee to apply pressure to the film and adhere it to the headlight. Make sure to heat stretch the film over the headlight so that it will easily conform to any dipped areas of the headlight.
- Lift the film up near any wrinkles that may present themselves and pull them perpendicular to the lines to release the tension. If light pulling does not work, apply heat to shrink the lines away. Repeat this process as needed to get the film as smooth as possible.
- As you approach the edges of the headlight, you will notice some folds/creases. When this happens, slightly pull the film at the edge and pull it tighter across the headlight and apply heat to stretch the film and squeegee it down. This step may need to be repeated a few times until all folds/creases have disappeared.
Finishing the Install:
- Once the film is smoothly applied to the entire headlight of the film, use the bar edge of the felt squeegee to push the film into the tight gaps between the panels of the car.
- Carefully cut the film around the outer edge of the panel to allow you to push the extra film underneath the headlight once cut to ensure the headlight has no exposed areas.
- Lightly pull the excess film away from the vehicle paying close attention to ensure the film is completely cut all the way through.
Cleaning and Maintenance of the Film:
- Leave the film to dry for 24 hours without touching it. Wait 1 week after application before washing your car or the headlights.
- Clean the headlight with a standard cleaning solution and a soft cloth.
- Do NOT use any type of scraper or other abrasive tool on the headlight.
Scorpion Protective Coatings has been serving the automotive accessories market since 1996. We offer truck bed liner, window film, ceramic coatings, and other automotive accessories.
(800) 483-9087
www.scorpioncoatings.com
